Wednesday, November 28, 2012

A Boxwood Christmas Wreath


Hello!  I've got another wreath tutorial to share with you today!  I think this boxwood wreath might be my favorite.

This is what you will need to make your own boxwood wreath:

Boxwood clippings (I cut mine from my yard)
A wire hanger
Floral wire
Wire cutters
Ribbon (optional)

First, take your hanger and pull the bottom portion until it forms an oval.  


In order to cover the hanger, use two longer clippings together and wire them to the hanger.  Make sure to tuck the wire under the leaves so that it is not as visible.


Work your way around the hanger, making sure to keep the leaves facing the same direction so that it looks neat.  Cut the top portion off of the hanger and attach your ribbon.  You're done!


I've made quite a few of these already for our home and like the little splashes of green they add.  I'm hoping they dry well and stay green enough to keep things merry and bright all winter long!


Thank you for reading.  See you soon!

I'm linking up to:
Craftberry Bush
Design, Dining, and Diapers
Crafty, Scrappy, Happy
Hi Sugarplum!
Centsational Girl
Nesting Place

Monday, November 26, 2012

Clay Mushroom Ornaments


Hello!  I hope you all had a wonderful Thanksgiving!  Ours was filled with the slow and steady completion of projects around the house and some fun with our boys, all while eating our fill of turkey and all of the fixings.  Throw in some Christmas decorating inside and out and it was a flurry of activity, I tell you!  I wish I could say that I had pictures to share from our weekend, but Jason only managed to snap a few with our camera while I took a few more with my phone.  It is funny.  I used to be attached to that camera and felt like the boys rarely saw me without that thing.  Now, I use my phone to take pictures.  I've gotten lazy!  I need to find a happy medium.  I'll be working on that in the next few weeks.

Today, I have a delightfully easy and whimsical project to share with you!  Last year, I purchased the sweetest glass mushroom ornaments from Crate and Barrel.  How fun, I thought, it would be to make these myself!  And so I did!  

Here is what you will need to make your own clay mushroom ornament:

Clay, I used Original Sculpey Clay in white (the oven-bake kind)
A wooden skewer
Glitter glue
Glitter
String or twine

To begin, you will need to gather two pieces of clay roughly the same size and form one into a long tube-like shape and the other into a flat, round disk, similar to this:


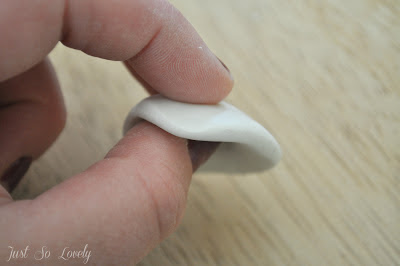
Take the flat disk shape and press your thumb into it, so that it forms a cup-like shape.  Then, take the tube-like shape and flatten one end of it so that it can stand up.


Your pieces should look like this when you are done.


Carefully push the two pieces together to form your mushroom.  To make the hole at the top, use a wooden skewer.


The hole should look like this after you remove the skewer.  You are now ready to bake your mushroom.  To do this, follow the directions on your clay packaging.


To decorate your mushroom, simply brush with glitter glue and sprinkle with glitter.


After the glue has dried, you are ready to hang your mushroom.


Have you made any ornaments this year?  Have you started decorating for the holidays yet?

Thank you for reading!  Have a wonderful day!

I'm linking up to:

Sunday, November 25, 2012

Thanksgiving Turkey Herbs

I know, I know.  Thanksgiving is over and we've all moved on to Christmas.  I know.  Me too.  But, allow me one last post about Thanksgiving, as it was almost complete (but not quite) before the great turkey roasts around America.  I'm sorry.  Maybe you'll thank me next year, or the next time you need some seasoning for your roasted chicken (because it works for that, too)!


To make this turkey rub, you will need one teaspoon of each of the following dried herbs: 
basil
rosemary
marjoram
thyme
oregano
savory
sage
lavender


Crush them together in a mortar and pestle, or a food processor if you have one.


Store in an airtight container for up to three months.  Enjoy on all poultry dishes!

Next time, we'll be moving on to Christmas.  I promise.

Thursday, November 15, 2012

A Thanksgiving Sage Wreath


If you're looking for a fitting way to decorate your home or need a hostess gift this Thanksgiving, you might want to try making a simple sage wreath.  Since many cooks use sage to season their turkey and stuffing, it makes perfect sense to incorporate this herb wreath into the celebration!  

To make a sage wreath you will need:

A large quantity of sage (10-12 big bunches)
Sturdy wire (formed into a circle) to serve as your frame
Floral wire
Wire cutters

Trim off the thick ends of your sage as well as any brown, spotted leaves.  Using your floral wire, attach one bunch of sage at a time, working your way around your wire frame until it is full.  Easy, no?

I'll be back soon with more Thanksgiving fun!
(and yes, I'm using sage again...  Can you sense a theme here?)

*****

Oh, just in case you're interested in more herb wreaths, you can go here!

Wednesday, November 14, 2012

Sage and Leaf Thanksgiving Placecards


Placecards for Thanksgiving can be easy, inexpensive, and elegant even when you use ordinary things from around your home.  For these placecards, I used sage from my herb garden, oak leaves, and twine.  Simply bundle together a small bunch of sage, a leaf, and wrap with twine.  Write your guests' names on each leaf and you've got yourself something extraordinary out of the ordinary.


I'll be back tomorrow with more Thanksgiving fun!

Monday, November 12, 2012

Our Outdoor Fall Decor


I kept things pretty simple in the front yard this year.  Some orange mums, small pumpkins, and grass stalks harvested from another area of our garden helped to fill in the window boxes and urns.  The dusty miller and wire vine are pretty cold weather friendly, so they stayed as well.

********

I know I've been a little neglectful of this blog lately (again)!  I've been working hard at projects but am finding that time to actually document them on here is the most difficult part.  Enjoying my boys always comes first.  However, I have some ideas for Thanksgiving to share with you in the coming days, so I hope you'll check back soon!  And if you've emailed or left a comment in the past few weeks, I will get back to you.  I WILL!  Those emails and comments always mean so much.

Thanks for reading.